Saturday, March 31, 2012

caesar salad with polenta croutons and toasted parmesan crisps

I'm not a picky eater, but I do like to think I set a high standard for the food I'm willing to eat. When it comes to Caesar salad, it's hard for me to find a decent store bought brand. The issue is it never really tastes like what you get at a restaurant (I'm talking real Italian type). Store bought bottles are usually heavy on the creamy factor and cheese, and taste almost like a ranch dressing with some black pepper thrown in. I just can't get behind that.


Surprisingly, I've never tried to make my own Caesar dressing.

I know, for someone with such high standards you'd think that would be the first thing I did, right? Maybe I should have, but I guess I just treated Caesar salads like, well, a treat. Only to be consumed at restaurants where the dressing passed my test.


There's a whole slew of dressing recipes floating around, but most of them I found don't have egg. I felt like if I was going to try this, I had to do it right. Right includes raw egg. As someone who routinely eats a few cookies' worth of cookie dough while baking, this wasn't really an issue for me. 

Bonus points went to this recipe for being easy (I mean, how hard can salad dressing be?), and a few extra for it being tasty. I have a feeling my salad consumption is about to go through the roof.


Sidenote: don't be intimidated by the long list below! I just divided it to make it easier to read. You really can do all of this at once, and start to finish I think it took me about 10 minutes tops. 


Caesar Salad with Polenta Croutons and Toasted Parmesan Crisps (serves 6)

For the Dressing

1/2 cup olive oil
1 tablespoon red wine vinegar
1 teaspoon dijon mustard
1 large clove garlic
1 teaspoon Worcestershire sauce
1/2 cup grated parmesan
freshly ground black pepper
1 teaspoon anchovy paste
juice of 1/2 lemon
1 egg yolk

Combine all ingredients in a blender and process until smooth. Dressing may separate if it sits too long, and if this happens just give it a quick stir.

For the Croutons

4" polenta, cubed
1-2 tablespoons canola oil
1/2 cup flour or corn starch

Toss polenta cubes in flour/corn starch to lightly coat. Heat oil in a large skillet and fry polenta cubes for a few minutes on each side, until they're golden brown. Transfer to a paper towel to drain.

For the Parmesan Crisps

1 cup shredded parmesan

Preheat oven to 425*. Line a baking sheet with parchment paper. If you have a silpat mat that's even better! Arrange parmesan into six equal piles on sheet and shape each into a flat circle, about 3" in diameter. Bake for 2-3 minutes, until golden brown. Allow these to cool slightly before removing (very carefully) with a spatula from the tray.

To prepare the salad

Wash about a cup of lettuce per person. Romaine is traditional, but I used mixed greens for more nutritional value. Put lettuce in whatever bowl you're serving in, and drizzle dressing over top. It might be good to add a little at a time until you have enough (you may not use the entire batch). Add croutons and toss lightly with salad tongs. Sprinkle shredded parmesan on top, and when you serve the salad place a parmesan crisp on top of each.

Thanks to Meagan for starting Recipe Madness! I've had a lot of fun participating (although I came up a few recipes short of 31), and finding new recipes to find!

Friday, March 30, 2012

scallion ginger marinaded cod

Every Thursday for the last four weeks, I've pulled out two pork chops for Friday's dinner for the Boyfriend and myself.

Every Friday, I remember it's Lent (I'm such a good Jew Girlfriend) and scramble to pick up seafood, instead.

Every Saturday, we have pork chops. Go figure.


This is super easy (isn't it always?) and pretty quick. If you need dinner on the table in under 30 minutes, this works! Look at me, I'm the next Rachel Ray, or something. You could also marinate the fish overnight (which I'd actually recommend), which means EVEN LESS TIME! My gosh.


Scallion Ginger Marinaded Cod (serves 2)

2 cod fillets, 6-8oz each
2 large cloves garlic, minced
1" ginger, peeled and grated
1/3 cup soy sauce
1 tablespoon sesame oil
1/4 cup canola oil
3 tablespoons scallions, chopped
1 teaspoon Worcestershire sauce

Whisk together all ingredients except the fish in a bowl large enough to hold the fish. Place fish in the bowl and let it sit for at least 20 minutes, the longer the better! While the fish is marinating, preheat the oven to 375. Place fish in a baking dish and pour marinade over top, and bake for 15-20 minutes depending on the thickness of the fish. The cod should be tender and flaky. If you're serving roasted veggies on the side, drizzle the extra marinade from the pan over them! I promise, it's good (we used cabbage).


It's Recipe Madness! Check out these blogs for more daily food updates all this month!
The Cheesefries Stand Alone
Food Feminism Life
Life's Little Epiphanies

Thursday, March 29, 2012

chili garlic roasted cabbage

Cabbage is like, dirt cheap. As such, it has become a staple in my fridge. 


Typically, all I do is chop up a head (remember, we're talking cabbage here) and throw it into the wok with a little butter. As tasty as that is (and it is - imagine all the buttery caramelized bits at the bottom! Yum), I decided to try something new. Roasting is a good way to go for any veggie, and it seems cabbage is no different from the rest. Serve this with a little curry aioli and you're good to go!


Chili Garlic Roasted Cabbage with Tikka Masala Aioli


1 head cabbage
chili powder
2-3 cloves garlic, minced

1/2 cup mayonnaise
1 tablespoon tikka paste

Preheat oven to 400*. Cut cabbage into 4-6 wedges. Arrange on a large baking sheet, drizzle with olive oil, and sprinkle with chili powder and garlic. Roast 40-45 minutes. For the dip, stir together mayo and tikka paste. Serve hot (the cabbage, not the mayo, duh).

It's Recipe Madness! Check out these blogs for more daily food updates all this month!
The Cheesefries Stand Alone
Food Feminism Life
Life's Little Epiphanies

Tuesday, March 27, 2012

brown sugar banana bread

Bananas are one of the best fruits to have around, especially in my family's household. We all like them at varying levels of ripeness, and once they're too ripe for all of us, we love banana bread. 


Our go-to recipe comes from the infamous box, but since you know, I live on my own now, I thought it would be fun to try a new recipe. Since these cupcakes were so tasty, I whipped up the batter and poured it into a loaf tin. The result was pretty awesome, if I do say so myself.


Brown Sugar Banana Bread

1 1/3 cups flour
1 1/4 teaspoon baking soda
1/4 teaspoon salt
1/2 teaspoon cinnamon
pinch of nutmeg
1 egg
3/4 cup brown sugar
1 teaspoon vanilla extract
3 large ripe bananas, mashed
1/4 cup sour cream
1/2 cup butter (1 stick), melted
1/2 cup walnuts, chopped (optional)

Preheat oven to 350*. Line a muffin tin with cupcake liners.
Combine flour, salt, baking soda, cinnamon and nutmeg and set aside. In a bowl (I had my stand mixer on medium), whisk egg and add brown sugar, mixing until smooth. Stir in vanilla extract. Add sour cream and melted butter and mix. Stir in dry ingredients, then add mashed bananas and mix until batter comes together. Fold in walnuts, if you're adding them. Pour batter into a greased loaf tin and bake 40-50 minutes, until a toothpick inserted into the center comes out clean. Let it cool a bit before slicing.

It's Recipe Madness! Check out these blogs for more daily food updates all this month!
The Cheesefries Stand Alone
Food Feminism Life
Life's Little Epiphanies
And if you want to play along, just leave a comment!   

Saturday, March 24, 2012

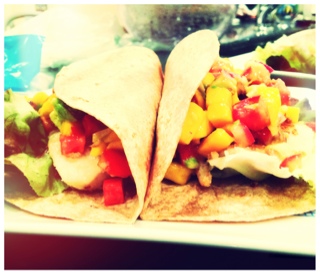
fish tacos with sesame ginger mango salsa

When at the Beach House, it's pretty much a must that you eat seafood. Or at least, that's how it is in my family.


We normally don't arrive early enough on Friday to make a proper dinner, but we got lucky this time. By the time I got to the house my parents had already been to the store, and picked up the goods. My dad had picked out a few different items, hoping they would go together, and he was definitely right.


These aren't your typical Latin tacos. With mangoes and ginger sesame dressing available, there was just no way around an awesome Asian-twisted salsa. Am I right?

These were light, sweet, and just a little tangy (only as much as a ripe mango can deliver). The perfect dinner to serve as a reward for battling DC rush hour (I'm still not sure why it's called rush hour when it seems to last all day) to make it out to the beach.


Fish tacos with sesame ginger mango salsa (makes 8 large tacos)

8 small tilapia fillets (2-3oz each)
1 cup panko breadcrumbs
1 cup egg whites
1 cup flour
1 1/2 - 2 avocados, diced
2 mangoes, diced
1/4 cup red onion, minced
1 cup tomatoes, diced
3 tablespoons sesame ginger dressing
1 cup your favorite lettuce
8 flour tortillas, soft taco size
2 tablespoons canola oil

To prep the fish, dredge in flour, then dip in egg whites and then panko, coating thoroughly. In a medium bowl, combine mangoes, avocado, tomatoes and red onion, and toss with dressing. Heat oil in a large pan over medium to medium-high heat. Arrange fish in the pan and cook on each side 2-3 minutes. To arrange tacos, put lettuce down first, then fish, then a few spoonfuls of salsa.

It's Recipe Madness! Check out these blogs for more daily food updates all this month!
The Cheesefries Stand Alone
Food Feminism Life
Life's Little Epiphanies
And if you want to play along, just leave a comment!  

Friday, March 23, 2012

happy spring!

There is no food in this post.

We pass countless streets lined with Cherry Blossoms every day, and as someone who has lived in the DC area for my entire life, I still never ever get sick of them.

This picture makes me think of Spring and Summer and grilling and beaches and tans and fun, and I wanted to share it with you.


Happy Spring!

Thursday, March 22, 2012

goat cheese breakfast quesadilla

This was one of those mornings where I opened the fridge and realized I had pretty much nothing.

And by nothing, I mean I had plenty of stuff but didn't feel like putting forth the effort to mix any of it together into a decent meal.

Quesadilla to the rescue!

Most mornings, I have an egg white omelette with cheese and veggies, and a slice of toast on the side. However, tortillas were on sale last weekend so I picked up a few packs. It's good to shake things up every once in a while, I suppose. I love the tang of goat cheese, so I thought I'd use that instead of the usual cheddar or mozzarella. You know, make it special. The quesadilla came together in about 5 minutes, which is roughly my limit for breakfast cooking on weekdays (unless it's for corned beef hash, but more on that later). I made this in the cast iron so the tortilla got nice and crispy, in the way that you typically only find at a restaurant or maybe in the dining hall of your college campus (or maybe at home, if you're a little more patient than I am). I'm also happy to report that this meal kept me full straight through to lunch, which I forgot about until about 1:30.


Breakfast Quesadilla (serves 1)


1 flour tortilla, soft taco size (the medium one)
1/2 cup egg whites
1-2 oz goat cheese
2 tsp canola oil

In a frying pan over medium heat, cook egg whites in half the oil (use a spray if you prefer) until done. If you want to add veggies, now would be the time. Remove from pan. Heat the rest of the oil and place tortilla in the pan, then add goat cheese and let it melt a bit. Add egg whites on top of cheese, and fold the tortilla in half. Press it together and let cook for a couple minutes on one side, then flip and cook for another minute or two. This cook time is really dependent upon how well-done you like your tortilla, since the egg is cooked already.

It's Recipe Madness! Check out these blogs for more daily food updates all this month!
The Cheesefries Stand Alone
Food Feminism Life
Life's Little Epiphanies
And if you want to play along, just leave a comment!   


Tuesday, March 20, 2012

german pancake

Family is a funny thing.


My dad and I both associate this pancake with childhood, but not together. When we first discussed making one, he couldn't believe I'd ever had it before. To me, this pancake brings back memories of the night before leaving for sleepaway camp (this one, specifically). I would stay at my friend's house (she lived just a couple hours from camp, as opposed to the 7ish I did), and in the morning we'd have this for breakfast. We also probably had it for breakfast most other times I slept over, but the memory is forever attached to camp. To my dad, this pancake reminds him of meals with his mom.

                                                       
This realization of a similar (but not shared) memory came just a few minutes before (after?) my brother said something to the puppy, and my mom and I simultaneously responded in our best sad puppy voice, in the same tone and pitch, with the same exact words. 

It's a good thing I love my parents, because it seems as though I'm turning into them.

We ate the pancake for dessert, served kind of like a crepe (except not rolled or folded, as you can see below). The consistency is a bit thicker and eggy, somewhere between a crepe and a popover. I'm sure you could eat it savory if you wanted (there's no sugar in the batter), but we went the powdered sugar, maple syrup and fresh fruit route.

The recipe comes straight out of the recipe box, filled mostly with index cards almost as yellow as the pancake itself from age, in very typewriter-looking font (it may have been from a typewriter, I actually haven't ever asked. Anyone care to weigh in?). I'm sharing a snapshot of the original recipe card, so you have an idea of how we roll. You can tell the recipes that came from Nonny (what we called my dad's mom), because they have next to no instructions. Actually, this one is a blessing - it has cook times. When I get around to sharing icebox cookies, you'll notice we weren't as lucky.

The best way to learn though is to be thrown in head first, right?


Just beat everything together and pour contents into an oven-safe pan (we used the cast iron, and doubled the recipe because the pan was so large, instead of halving the pan size. Clearly we have our priorities straight). Bake as directed. Under no circumstances are you to open the oven while the pancake is inside!

It's Recipe Madness! Check out these blogs for more daily food updates all this month!
And if you want to play along, just leave a comment!   

Monday, March 19, 2012

fish and chips

Fridays in London were fish and chips day. I'm not sure why or when I started this tradition, especially since I had such an inconsistent and wide-open schedule (going to class for three hours twice a week does not a busy life make). All I know is every Friday I was at my flat (there were several where I was in the middle of an extended sleepover {ranging anywhere from one night to four} at the fabulous 49 Croxley in my own personal L'Auberge Espagnole of sorts), I would walk around the corner to my chippie (I tried several, this was my favorite) and pick up a half cod and chips. This meal, accompanied usually by a Strongbow and copious amounts of Sarson's malt vinegar, kept me company while I watched DVDs of my favorite shows from back home.

Of course, when you have to walk pretty much everywhere, you can get away with this.

Back Stateside, I don't get to eat fish and chips often, but when I do I make it count. Since we're in the middle of Lent, and for the third week in a row were planning on making pork chops on Friday, I figured I needed something good to help the Boyfriend cope with once again putting the pork chops back in the freezer. 

This totally hit the spot.


Fish and Chips (serves 4)

4 fillets of a mild, white fish (Cod is traditional)
1 1/4 cup flour
1 cup beer
salt and pepper, to taste
2lbs potatoes
oil for frying (at least a few cups)

For the fish, heat oil in a saucepan large enough to lay the fish flat, on medium-high. Whisk together 1 cup flour, beer, and a few shakes of salt and pepper in a bowl. Put remaining flour on a plate and coat each fillet. Once the beer has settled a bit, drop fillets into the batter and carefully lower them into the pan. Fry on each side for 3-5 minutes, depending on the thickness of the fish. 

Slice potatoes into rounds. I did about 1/2" rounds for thicker cut fries, but you can slice them thinner if you want something closer to shoestring. Slice rounds into fries. Pat them dry. If you're frying the fries, have some oil in a saucepan ready to go, and carefully drop them in (I used a slotted spoon). Let them cook for 10 minutes or so, until they're as well done as you'd like. Lay them out on a paper towel to drain any excess oil. If you're baking your fries, toss them in a little oil and arrange on a baking sheet. Bake 30-35 minutes at 425*, flipping once about 20 minutes in.

Chester says, "what's that delicious smell? Can I have some? It probably tastes better than my most favorite bone ever, which is saying a lot."


It's Recipe Madness! Check out these blogs for more daily food updates all this month!
The Cheesefries Stand Alone
Food Feminism Life
Life's Little Epiphanies
And if you want to play along, just leave a comment!  

Saturday, March 17, 2012

baked mozzarella cigars with jalapeƱo cilantro aioli

I would have called them mozzarella sticks, but to me that implies breading. And deep frying. And so much deliciousness.

These are baked though, and remind me more (in structure, at least) of a local Lebanese restaurant's version of mozzarella sticks, which they wrapped in phyllo and called cigars. So, I'm going with it.

Since it's St Patrick's Day and all, I figured I should post something green. This isn't remotely Irish, and there's a possibility I realized the dip was green after the fact, but that's neither here nor there. The dip is very similar to one I had at this awesome hole-in-the-wall restaurant (seriously guys, it's attached to a motel. Oh and they take reservations, but they won't ask you about it when you walk in. Just sit anywhere you'd like). If you live nearby, you absolutely need to go. Order the tequeƱones (their cheese sticks). Maybe some fried yucca, while you're at it. And definitely go for a grilled arepa.

If you don't live nearby, or really like cheese (or both), make these. They should hold you over for a bit.


Baked Mozzarella Cigars with JalapeƱo Cilantro Aioli


1/2 package won ton wrappers
2 mozzarella sticks


Preheat oven to 375*. Lay out wrappers on a flat surface. Slice mozzarella sticks in half lengthwise, and then cut into pieces about 1/4" shorter than the won ton wrappers on each side, leaving room to fold the wrappers over. Fold the sides over the cheese, then roll from the bottom up (like a burrito), securing the roll with a little water brushed across the top side. Place on a baking sheet, preferably on parchment paper or silpat, bake about 15 minutes or until golden.


For the Sauce


1/3 cup mayonnaise
1/4 cup cilantro
1/2 jalapeƱo
1-2 cloves garlic
1 tablespoon olive oil


Toss all ingredients into a food processor and blend until smooth. Try not to eat all of it before the cheese sticks are done.


It's Recipe Madness! Check out these blogs for more daily food updates all this month!
The Cheesefries Stand Alone
Food Feminism Life
Life's Little Epiphanies
And if you want to play along, just leave a comment!  


Thursday, March 15, 2012

this post brought to you by my 92* office.

On Monday, it was kind of still Winter. On Tuesday, it was most definitely Spring. The last two days, I'm pretty sure Summer rolled into the DC area. Since I work at a university, in one of the oldest buildings on campus, our air-conditioning is dependent upon an automatic system that turns everyone's A/C on, and everyone's A/C off. It has to be above a certain temperature for five days in order for the heat to turn off and switch to A/C.

Thankfully, the weather is super consistent in DC (can you feel the sarcasm?).


As I sat at my desk, increasingly delirious from the way-higher-than-is-safe temperature in the office (it should never be 20* warmer inside than it is outside. Seriously.), all I could think about was my favorite refresher on a hot day. I was feeling particularly lazy (it was the heat, I swear), so I didn't want to make anything complicated, but I definitely needed a cure for my near-heatstroke condition.

This is what I kept coming back to.


Ice Cold Water (serves 1)

16oz water
8 ice cubes

Drop ice cubes into a glass, and pour water into glass. Be sure to enjoy the crackling sound the ice makes as it begins to melt.

I told you I was delirious.


It's Recipe Madness! Check out these blogs for more daily food updates all this month!
The Cheesefries Stand Alone
Food Feminism Life
Life's Little Epiphanies
And if you want to play along, just leave a comment! 


Edit: the Boyfriend has brought it to my attention that it might, in fact, be ok sometimes if the indoor temperature was 20* higher than the outdoor temperature like, say, in the dead of winter. Touche, Boyfriend.

Wednesday, March 14, 2012

buffalo chicken tenders

The Boyfriend, taking a bite of the dinner I made that he had declined before he knew what I made: "What sauce is this?"

Me: "It's Frank's Red Hot, the Buffalo one"

TBF: "This stuff is awesome!"

Me: "We've had it in the fridge since we moved in"

TBF: "Really?"

Just proves that you really do learn something new every day.


Ever since I replaced my awful panko with the fantastic panko, I've been itching to use it again. Since we have about a million pounds of frozen chicken, I took a piece out to thaw yesterday, planning on whipping up a quick dinner for tonight. When you have chicken, panko, and (you guessed it) buffalo sauce, the natural progression is buffalo chicken.

And buffalo chicken is what I did.


Since I'm being all healthy and whatnot, I served the crispy chicken tenders over a kale salad, but these would be great for an appetizer/sports party (hi, March Madness) finger food. Cut them up into chunks before cooking and serve them on toothpicks! That would probably be fabulous. In the most manly I-love-wings-beer-and-sports way possible.


Buffalo Chicken Tenders (makes about 5 tenders per chicken breast)


1 large chicken breast, cut into strips
1/4 cup egg whites
1/4 cup panko
2-3 tablespoons corn starch
1-2 tablespoons canola oil
1/4 cup Franks Red Hot (Buffalo Wing)

Heat oil in a large skillet over medium to medium-high heat. Dredge chicken strips first in corn starch, then in egg whites and finally in the panko, making sure each piece is fully covered. Carefully place chicken in the pan, and saute for about 3-4 minutes on each side, depending on the thickness. Test doneness by splitting the thickest piece you can find and making sure it's white on the inside. Toss or dip in buffalo sauce, and serve hot hot hot!

Check out the other fabulous bloggers participating in recipe madness!
The Cheesefries Stand Alone
Food Feminism Life

Tuesday, March 13, 2012

falafel

If you live in DC, or ever plan on visiting, you absolutely (without a doubt {no, seriously}) must go here for falafel. These guys serve up a tiny menu, consisting only of falafel (small or large, white or wheat pita), dutch fries (small or large) and brownies (special without being special). With only a few things to focus on, they've had a great opportunity to really perfect their food. They give you just the falafel in the pita, and have a toppings bar at your disposal to load the pita as you please. I highly recommend you fit as much as possible in that pita. The trick is to crush the patties to give you more space (if you don't, they'll know you're a rookie and make fun of you. I promise).


Since I can't make it to Adams Morgan on a nightly basis, I have to have a backup plan. Little fried patties of chickpeas may not sound like such a big deal, but they're more complicated than you would think. Case in point: back in college, my roommate and I decided that we wanted to make falafel for dinner. With no recipe, we set out blindly. That was our first mistake. We knew we needed the chickpeas ground so we could form patties, so we threw them, along with some spices, into the blender (second mistake) and turned it on (third mistake).

Have you ever tried to fry hummus?

We spooned our "batter" into a pan of hot oil, and walked away for a minute. When we walked back to the kitchen, our falafel was nowhere to be found! We searched through the oil with a spoon, but alas, our hummus balls had dissolved (go figure).

The next time we tried falafel, we used a box mix.

I'm happy to report that tonight's venture was far more successful. Wrapped up in a massive lettuce leaf with tzatziki, tahini, tabouleh and tomatoes (apparently I like alliteration in my food), this was the perfect meal to accompany an evening of reading outside on the first (and potentially last) perfect Spring night.


Falafel


1 large can chickpeas, rinsed and dried as much as possible (or use dry chickpeas that have been soaked overnight)
1 teaspoon cumin
1/2 teaspoon paprika
1/2 teaspoon chili powder
2-3 tablespoons fresh cilantro or parsley
2 cloves garlic
1 small onion, diced
1-2 teaspoons flour
1 teaspoon salt
oil for frying

Pulse all ingredients in a food processor until everything is combined and roughly chopped (you don't want a complete puree - that's called hummus). Freeze for 20 minutes. Heat oil in a pot or high-walled pan. Form mix into patties (mine were about 1 1/2 inches in diameter) and carefully drop in to the oil. Fry 2-3 minutes on each side, until each side is browned. Drain oil off on a piece of paper towel, and serve on salad, in a pita, or plain. Whatever you want! My favorites are lettuce, tomato, cucumber, red onion, tahini, tzatziki, and shredded cabbage. Sometimes a little hot chilli sauce. Glorious.

Check out the other fabulous bloggers participating in recipe madness!
The Cheesefries Stand Alone
Food Feminism Life

Monday, March 12, 2012

chicken korma

In the spirit of St Patrick's day, I thought it would be appropriate to post a string of recipes from ethnicities that start with I. You know, Sesame Street Style.

Which is why I'm making a lot of Indian food.

It's fitting, right?


This dish is one of my mom's favorites. Mostly mild with just a a touch of cayenne, anything but short on flavor with a sauce loaded with ground almonds, pistachios and cashews (that I swore for the longest time was coconut, and only coconut; I have a lot to learn {yes Dad, sometimes I'm humble}), perfectly paired with a dish of fluffy basmati rice. As with other Indian dishes, judging by the ingredients above the recipe looks super involved. As with other Indian dishes, looks can be deceiving.


The hardest part of the recipe? Remembering to start the recipe early enough so you can marinade the chicken ahead of time. As impatient as I tend to be, I'll be the first to tell you this step is crucial. Take my word for it, and thank me later.


The best part? Nap time after dinner.


Chicken Korma (serves 4-6)

12 skinless chicken thighs
1 cup plain yogurt
1 teaspoon corn starch
1/3 cup blanched almonds
1/3 cup raw cashews
1/3 cup shelled pistachios
2 tablespoons unsweetened desiccated  coconut
1 tablespoon poppy seeds (ideally Indian, but regular work)
2 cloves garlic
2 teaspoons cayenne pepper
2 teaspoons salt
1 1/2 teaspoons coriander seeds
1 1/2 teaspoons cumin seeds
1/2 teaspoons saffron
1/2 cup milk
2 tablespoons oil
1 stick cinnamon (about 3")
6 whole black peppercorns
4 whole cloves
2 1/2 thinly sliced onions
1 lb pearl onions

Pat chicken dry. In a large bowl (ideally plastic or glass, not metal - it affects the flavor), mix together yogurt and corn starch. In a small pan over medium-high heat, toast coriander and cumin seeds for 1-2 minutes. Toss the seeds, plus the nuts, coconut, garlic, cayenne, salt and poppy seeds into a food processor and blend until it forms a smooth paste. Stir the paste into the yogurt, and then toss the chicken in the sauce. Marinade at room temperature for at least 30 minutes, or overnight in the refrigerator. 

When you're ready to cook the chicken, heat the milk and drop saffron in. Set it aside to steep while you cook. In a large pan or wok, saute cinnamon, black peppercorns and cloves in the oil over medium-high heat for 30 seconds to a minute. Add sliced onions and saute for 6-8 minutes until they are soft and begin to brown. Place chicken in the pan in a single layer (make sure you get all the marinade out of the bowl! That's the good stuff). Turn the heat down to medium low and cook, covered, for 15 minutes. Stir occasionally to make sure the sauce doesn't burn. After 15 minutes, add in saffron milk and pearl onions. Cook for another 20-25 minutes, until chicken is fully cooked through. Serve with rice.

Note: when cooking your basmati rice, throw in a few whole cardamom pods for a slightly fragrant flavor (if you have them around).

Check out the other fabulous bloggers participating in recipe madness!
The Cheesefries Stand Alone
Food Feminism Life

Sunday, March 11, 2012

chicken tikka masala

I think I've outdone myself today.


Not to toot my own horn or anything, but if you blindfolded me and fed me this dish, I might mistake it for a dish straight out of a proper restaurant. I swear, I have not an ounce of bias towards my own cooking.

I've made curries before, but I think this might be the best yet. It might have something to do with the fact that I made the curry paste from scratch instead of using a store-bought variety, or the fact that I actually threw the sauce in the blender so there weren't any chunks of onions (not that I dislike a little texture, but it has its place). Whatever it was, this.dish.is.awesome. Awesomesauce, if you will.


Spicy, bright, tangy and stick-to-your-bones filling, I'm really thankful I decided this would be my lunch this week.

I also have a hard time believing I enjoyed this fabulous dish while the Boyfriend enjoyed, um, raw pizza dough for dinner. To each their own.


*Sidenote: the Boyfriend would like me to acknowledge the fact that he was suuuuuch a good boyfriend and went to the store for oil and cumin seeds at 4:30 on a Sunday (his least favorite time ever) for me. There, now we're even.*


Chicken Tikka Masala (serves 6-8), adapted from Curry Lover's Cookbook


For the tikka paste (if you so choose - otherwise you can find it at the store)


2 tablespoons coriander seeds
2 tablespoons cumin seeds
1 1/2 tablespoons garlic powder
2 tablespoons paprika
1 tablespoon garam masala
1 tablespoon ground ginger
1/2 teaspoon ground turmeric
1 tablespoon dried mint
1/4 teaspoon salt
1 teaspoon lemon juice
2/3 cup red wine vinegar
2/3 cup vegetable oil
2 tablespoons water
(Optional - a few drops each of red and yellow food coloring, to brighten the color)

In a small pan over medium-high heat, toast cumin and coriander seeds until they're fragrant, about a minute (they'll start to darken). Keep a close eye on these, and stir almost constantly. Transfer toasted seeds to a spice grinder or food processor, and grind to a powder. In a small bowl, mix together all of the dry spices. Once well mixed, add water, lemon juice, and vinegar (and food coloring if you're using it) and stir until it forms a loose paste. In a large pan over medium heat, heat oil and add paste. Saute the paste until it brightens in color and the oil starts to separate back out (it will also have taken on a reddish color at this point, instead of the usual yellow), about 10 minutes. Allow the paste to cool and then store in an airtight container. This paste will keep for 3-4 weeks in the refrigerator (and you'll only use about 1/8 of it for this recipe).

For the Chicken


2 large chicken breasts, cut into 1" cubes
1 medium eggplant, cut into 1" cubes (optional - I like extra veggies in my dishes)
6 tablespoons tikka masala paste
4 tablespoons (about 1/4 cup) plain yogurt
2 tablespoons vegetable oil
1 onion, chopped
1-2 garlic cloves, crushed
1 fresh chilli, chopped (I used a jalapeno)
1" fresh ginger, grated
1 tablespoon tomato paste
1 tablespoon almonds, ground
1 cup water
3 tablespoons butter (I think this could be omitted if you want)
1/4 cup heavy cream
1 tablespoon fresh lemon juice
fresh cilantro, to garnish

Mix together yogurt and half of the tikka paste in a bowl large enough to hold chicken and eggplant. Toss chicken and eggplant in the sauce until everything is well-coated, and set aside to marinade. In a large saucepan or wok, heat oil over medium heat. Add onions, chillies, garlic and ginger, and saute for 5 minutes or until the onion softens. Add the other half of the tikka paste and saute for two more minutes. Stir in tomato paste, almonds and water and simmer for 15 minutes. Transfer to a blender and puree, adding in heavy cream and lemon juice.

After removing sauce from the pan, melt butter if you're using it (if not, you probably don't need anything extra in the pan since there's oil in...everything). Add chicken and eggplant, and cook over medium heat until the chicken is cooked through, about 15 minutes. Add curry sauce to the pan and simmer for at least 5 more minutes to reduce the sauce a bit. Serve with rice or naan (I served with quinoa).


Check out the other fabulous bloggers participating in recipe madness!
The Cheesefries Stand Alone
Food Feminism Life

Saturday, March 10, 2012

chicken and feta quiche

Quiche is such a perfect meal. It's carbs, dairy, protein and veggies all in one! If you ignore all the butter in the crust and the cream in the filling, it's like, healthy or something.


I had a bunch of ingredients to use up in the fridge, and thought this would be a great way to use them all up in one go. I even got a little over-zealous with the mixing of the toppings, which meant I had a salad to munch on while the quiche baked. That's how you know you've selected good fillings!


I used a basic pie crust (with whole wheat flour) for the crust here, so it was a little more crumbly than other quiches I've had. I happen to love that, and if you don't then we probably can't be friends. The best part of this dish is you really can use any combination of ingredients (classics include spinach, cheese and bacon), which means you can probably whip one up without even having to hit up the store.


Quiche (serves 6-8)

Preheat oven to 350*.

For the Crust

2 cups flour (I used whole wheat but white works too)
2 sticks butter, softened but still cool

Knead the flour and butter together with your hands until they form a dough. Roll it into a large enough circle to fit a 9" pie plate, or just place the dough in the plate and press it into form with your hands (that's what I did). I love a lot of crust so I had a pretty thick base (see above). If you want it a little thinner, you don't have to use all the dough.

For the filling

6 eggs
1/4 cup whole milk or heavy cream
1/2 cup cooked chicken, cubed
1/2 cup fresh arugula
1/2 cup kale, stripped from stems and broken into small pieces
1/4 cup shredded mozzarella
1/4 cup crumbled feta
1/4 cup red onion, minced
1/4 cup cherry tomatoes, diced
salt and pepper
**The only constants will be the eggs and milk. All the other fillings are up to you, but this is what I used!

In one bowl, whisk together eggs and milk. Season with salt and pepper. In a second bowl, toss together everything else except for the shredded mozzarella until well combined. Fill the pie shell with your filling mix. If it's a little higher than the dish, that's ok - it'll cook down. Pour the egg into the dish, making sure it's evenly distributed. Sprinkle with shredded mozzarella. Bake for 35-40 minutes, until the egg is set (if you move the dish side to side, the egg won't slosh around). Let the quiche sit for at least 15-20 minutes to really set up. Serve warm or room temp.

**I found the crust to be much more stiff after refrigerating overnight. If you like a harder crust, I'd suggest making this the day before you want to serve it, and then letting it come to room temp on the counter about 30 minutes to an hour before serving.

Check out the other fabulous bloggers participating in recipe madness!
The Cheesefries Stand Alone
Food Feminism Life

Friday, March 9, 2012

stove-top popcorn

On days where I don't feel particularly well, or I'm having a rough day, and the most appealing activity is curling up on the couch/in my bed/insert-other-horizontal-surface-here, the only thing I can fathom eating is something ultra-comforting. Popcorn is one of those go-to comfort foods. And I'm not talking microwave popcorn, or air-popped in one of those schmancy contraptions; I'm talking old school, oil-in-the-pot stove-top popcorn.


My mom taught me how to make popcorn her way when I was pretty young, in a pot that she had purchased in college and never strayed from in however many years (20?). I remember fighting with my brother over who got to shake the pot mid-pop. I'd like to say I always won, but we probably alternated. Eventually we took over full popping duties, which was a huge deal in our house. I can't tell you how many times I would bring my dad popcorn and he'd look skeptically at the bowl and ask "who made it?".

I told you, popcorn is serious business.

A while after I had earned popcorn privileges, I managed to break the sacred popcorn pot. I went to shake the kernels around, and one of the handles went flying off the pot. I may have cried.

The positive spin on this? We got a new popcorn pot with a clear lid! (Did I mention the old one was all metal? Lots of guesswork. Very tricky stuff). It's way more fun making popcorn when you can watch the kernels pop, pop, pop until they reach the lid and you realize that once again, you got a little over-zealous pouring kernels in to the pot and you're going to need another set of hands so you can carefully pour out half the popcorn without any rogue pieces attacking you so you can continue popping without the fluffy kernels popping lid right off. I'd like to seriously stress the whole "extra hands" bit. I once tried to do this step myself and the lid ended up sliding out of my hands onto the floor, almost landing on my bare feet, and completely shattering. Thank goodness for tempered glass.

Anyway.

There are plenty of ways to season popcorn, but the tried-and-true choice is simply butter and salt. My mom will melt butter until just melted, but my brother and I brown the butter a bit so it has that awesomely rich and nutty flavor.

Now that I've successfully talked about a non-recipe for longer than I would give most real recipes, I should probably end the suspense and just get on with it.


Stove-top Popcorn (3 tablespoons of kernels will give you about 3-5 cups popcorn, but I rarely (who are we kidding?) never measure)


1 tablespoon canola oil
popcorn kernels
salt
1-2 tablespoons butter

In a large double-handled saucepan (pick one with a lid!), heat the oil on medium with a few kernels dropped in. When you start to see tiny bubbles forming around the kernels, dump the rest of the kernels into the pot. If you just barely cover the bottom of the pot, you should get a full pot of popcorn (I've found this to be true regardless of the pot size). Swirl the kernels around to coat in oil, then leave them alone. After a few minutes you should hear the kernels begin to pop. Once they really get going, give the pot a good shake (hold onto the handles and lid very tightly). You want everything to mix around so nothing burns. Towards the end, use the microwave popcorn rule - the popcorn is done once you can count three seconds between pops. Once you get to this point, turn the burner off and let it sit for a minute or two, to allow for any strays (so they don't attack you when you open the pot). Dump popcorn into a bowl and set aside.

If you're topping with butter, slice some into the pot after dumping out the popcorn. Let it melt and then drizzle over the popcorn. We usually pour a little popcorn back into the pot and swirl it around to get up any extra butter. Salt after buttering to help the salt stick! And make sure you mix the popcorn (I usually use the butter knife).

If you're feeling weird, drop some popcorn into tuna salad. I dare you. It's fantastic.

Check out the other fabulous bloggers participating in recipe madness!
The Cheesefries Stand Alone
Food Feminism Life

Thursday, March 8, 2012

classic hummus

Hummus is one of the best things, ever. I'm not even sure what else I can say, other than go make some right now. 

And maybe (just maybe) add a little buffalo sauce to it. 


Classic Hummus


**this is something best made with the taste-as-you-go approach. A lot of the seasonings are strong in flavor, so start with a smaller amount if you're unsure and work your way up**


1 large can chickpeas, drained and rinsed
1-2 cloves garlic
1/4 cup olive oil
2-3 tablespoons tahini
1/4 teaspoon paprika
1/4 teaspoon chili powder
1/2 lemon's juice
salt to taste

Throw everything into a food processor and blend until smooth. Serve with veggies and/or pita chips and/or a spoon. Ta da!

(If things aren't mixing as easily as you'd like, try adding a little more olive oil. Sometimes the processor just needs a little more liquid to move everything around)

Check out the other fabulous bloggers participating in recipe madness!
The Cheesefries Stand Alone
Food Feminism Life
Kelly's Stellar Kitchen  

Wednesday, March 7, 2012

caramel macchiato cupcakes

Growing up, I had a nanny who was originally from Peru. One of my favorite activities was making Alfajores, which are a Lain American cookie, basically dulce de leche shortbread cookie sandwiches (dusted with powdered sugar {are you drooling yet?}). Simple shortbread cookies are my favorite, but that spread in the middle is just pure heaven. I can't tell you how many cookies were lost in the process because I purposely broke them while making the sandwiches the cookies are really delicate and a 7 year old doesn't have the gentlest touch. The best part was (quite like a beignet) inhaling the cookie too fast and breathing in powdered sugar, inducing a combination coughing/laughing fit for the next few minutes.

I'll have to make them for you some time.


These cupcakes are kinda-sorta inspired by those cookies (in that I ate the dulce de leche out of the can with a spoon while cooking used the same dulce de leche for the caramel part). One of my favorite spring/summer drinks is an iced caramel macchiato, and since it's not quite warm enough for iced coffee I thought a nice compromise would be a cupcake. The espresso and caramel go together so well, and instead of full-on frosting I chose a simple whipped cream to mimic the milk in the drink. Since the caramel is pretty rich, the cream cuts through it nicely. If I were you, I would make these sooner rather than later!


Caramel Macchiato Cupcakes (makes 24 mini and 6 full-sized, or 18 full-sized)


1 cup cake flour
1/2 teaspoon salt
2 teaspoons baking powder
3/4 cup granulated sugar
3 egg whites
1/4 cup whole milk
5 tablespoons butter, softened but still cold
2 shots espresso (about 1/3 cup)
1 teaspoon vanilla
1 can sweetened condensed milk

Place the condensed milk can in a pot and cover with water. Bring the water to a boil and then reduce to a simmer, and cook for 30 minutes to give it a head start. Preheat your oven to 350*, line a muffin tin with cupcake papers and spray each with cooking spray. Meanwhile, measure dry ingredients into your mixer bowl. Mix in butter until the mixture has the consistency of crumbs. In a separate bowl or measuring cup, gently whisk together egg whites, vanilla, milk and espresso (I'm sure you could use coffee if you don't have espresso available, or even a small amount of coffee liqueur). Pour about 3/4 of the liquid into the dry ingredients and whisk together, then add the rest until the batter comes together. Evenly distribute the batter among the cups, filling about half way (leave room for the caramel!). Open up the can of condensed milk, which should be a bit more condensed and darker in color at this point. Drop a small amount of caramel into each cupcake and swirl around with a toothpick. Some of it will settle to the bottom, but it will bubble up while baking so it'll still be throughout the cupcake. Bake mini cupcakes for 16-18 minutes and regular cupcakes 20-22 minutes, until a toothpick inserted comes out clean. Transfer to a cooling rack and let them cool completely before frosting.

For the Whipped Cream


Measure 1 cup of heavy whipping cream and 1/4 cup granulated sugar (I chose granulated over powdered sugar because I think it's a little less sweet - don't worry, it doesn't affect the texture) into your mixing bowl. Whisk on high until you start seeing ripples in the cream that stick (ie the cream isn't just splashing back and forth). Turn off the mixer; when you raise the whisk out you should get soft peaks in the cream. This process will take a few minutes, and I wouldn't walk away otherwise you may end up with sweet butter! Top each cupcake with a dollop of whipped cream.

Check out the other fabulous bloggers participating in recipe madness!
The Cheesefries Stand Alone
Food Feminism Life
Kelly's Stellar Kitchen   


If you'd like to join in, just leave a comment!